This topic tells how to start a new dictionary project. However, you need to do some other things first, before you start the project.
After you do those two things, you can start a new dictionary project in SooSL.
There are four steps. SooSL will ask you several things about your new dictionary in each step:
You can change all your answers later. Don't worry about getting it exactly right at first. Just make your best guess now and move forward.
To start, click ![]() Tools >
Tools > ![]() New dictionary.
New dictionary.
First, SooSL asks for general information about the dictionary.
You will see this dialog:
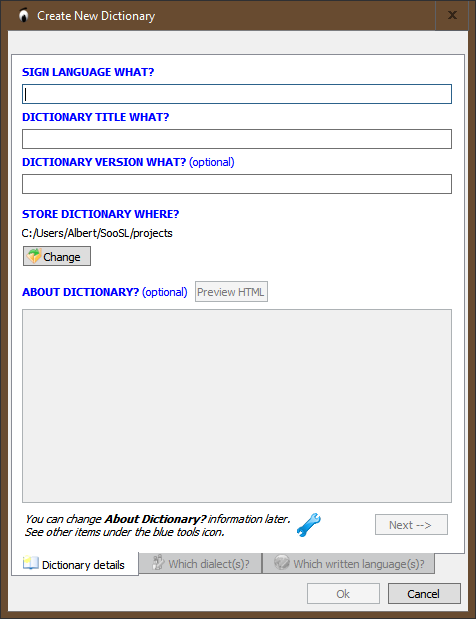
In SIGN LANGUAGE WHAT?, type the name of the sign language. There are several different ways to give the name:
In DICTIONARY TITLE WHAT?, type the title that you want to give to the dictionary. Often, people list all the languages in the dictionary, with the sign language first. For example: "ASL - English - Spanish - French Dictionary" or "Diccionario LESSA - Español".
In DICTIONARY VERSION WHAT?, you can, if you want, type a version number. This is helpful if you plan to publish several versions of the dictionary. For example, you might type in "1" for a first edition. Or, you can just put the current date, or the date when you will publish it.
In STORE DICTIONARY WHERE?, SooSL suggests a place where it will keep the files for the dictionary project. One good place is in the user's SooSL folder. If you want to keep them someplace else, click the  button. A special dialog will open. You can use it to choose a different folder.
In ABOUT DICTIONARY?, you can, if you want, type other information about the dictionary. For ideas of what information to put in here, see the help topic on general information about a dictionary. If you want, you can leave it blank now. You can add more information later.
You can use HTML codes in ABOUT DICTIONARY for special formatting. After you insert some HTML codes, click  to see what it will look like with the special formatting. Click
  to go back to editing the HTML code.
Click  to go to Step 2.
Next, SooSL asks about dialects of the sign language. You need at least one dialect.
You will see this dialog:
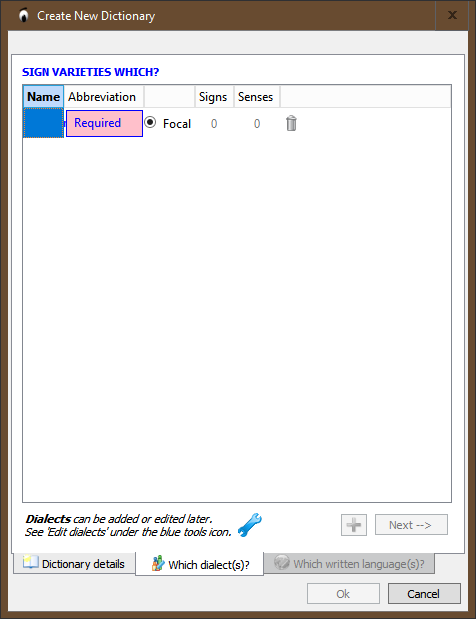
Type in the name and an abbreviation for the focal (main) dialect. You may need to click in the box under "Name" to start typing.
Usually, the focal dialect is the dialect that most people use. It might be the dialect used in the capital city, or in the city where there is a big deaf school. If there is a standard dialect, you can just call it "Standard" and use the abbreviation "std". Or, you can just use the name of the language and its abbreviation.
If you want to add more dialects now, click ![]() and type in the name and abbreviation of another dialect. You can always add more later.
and type in the name and abbreviation of another dialect. You can always add more later.
Click to go to Step 3.
Next, SooSL asks about written languages. You will use written languages for glosses, translations, and notes. You need at least one written language.
You will see this dialog:
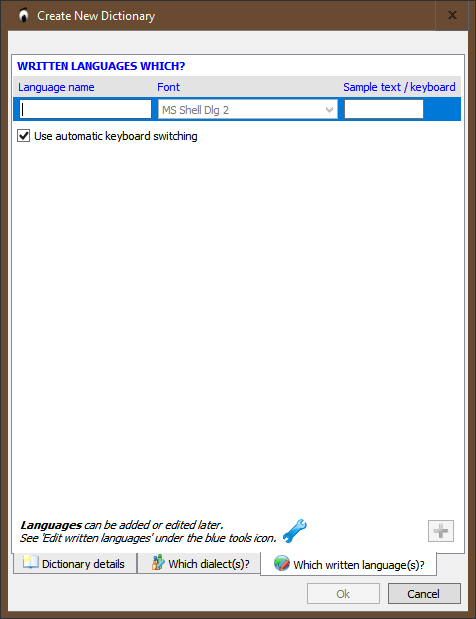
Click in the box below "Language Name" and type the name of a written language. For example: "English".
You can also set the font and keyboard to use with this language, but it is easier to do it later. For detailed instructions, see this help topic.
If you want to add more written languages now, click ![]() and type in another language name. You can always add more later.
and type in another language name. You can always add more later.
After you do all the above steps, you can return to any previous step. Click any of the tabs at the bottom of the dialog. This way, you can check your work. Remember, though, you can change everything later.
Click  to finish the setup. SooSL will make your new dictionary project.
Now you are ready to start adding signs to your dictionary.
Created with the Personal Edition of HelpNDoc: Single source CHM, PDF, DOC and HTML Help creation